

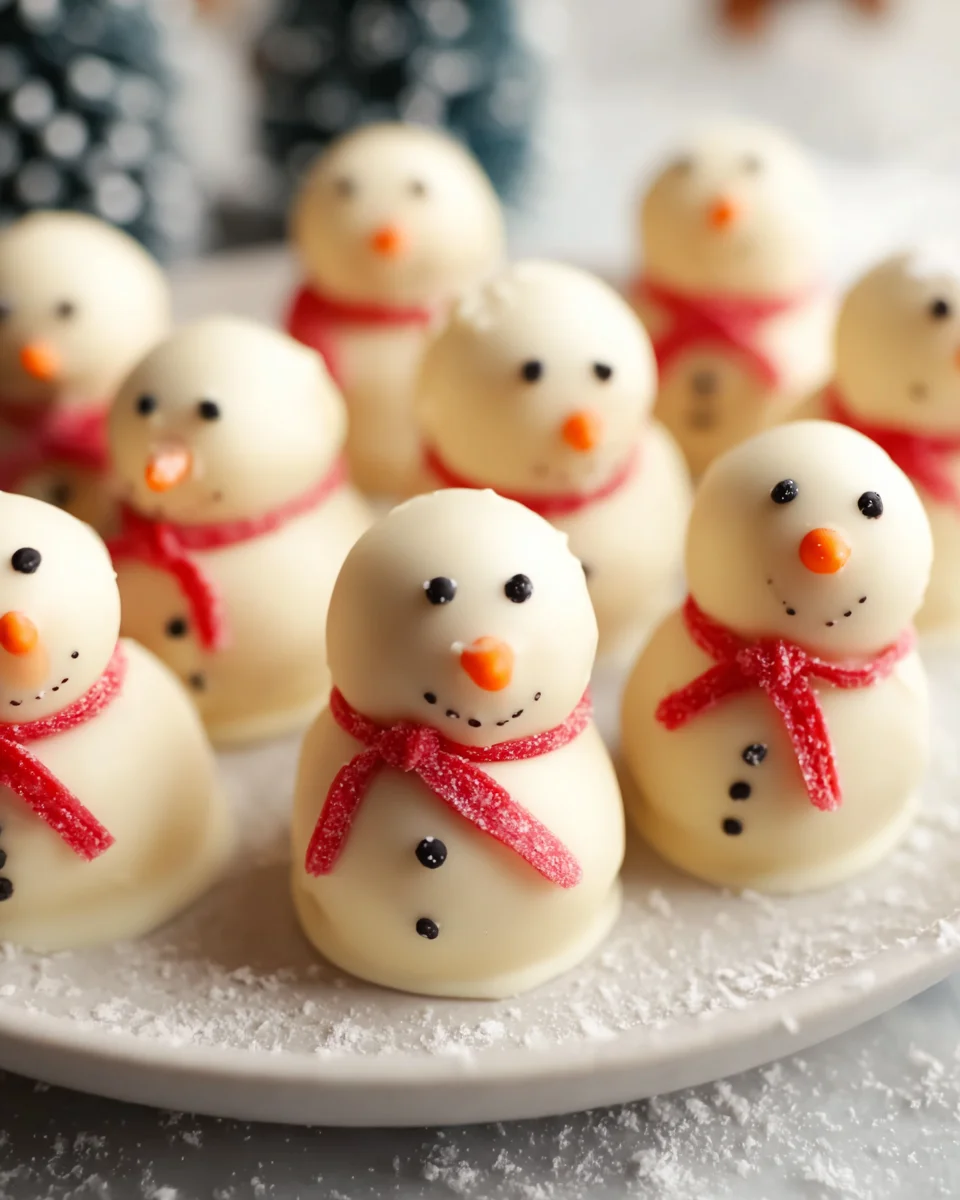
No Bake Snowman Truffles.html are here to bring a touch of whimsical winter magic to your holiday table without the stress of oven baking! Imagine the delight on faces young and old as these adorable, frosty treats make their grand appearance. As we gather during the festive season, there’s a timeless tradition of sharing joy through delicious, homemade sweets, and these charming snowman truffles perfectly embody that spirit. While traditional chocolate truffles have a rich European history dating back centuries, often associated with luxury and celebratory occasions, these delightful snowman variations are a modern, playful twist designed specifically for holiday cheer and convenience, adding a unique, festive dimension to our cherished seasonal customs.
Why Everyone Loves These Adorable Snowman Treats
People absolutely adore this dish for so many wonderful reasons. Firstly, their irresistible charm makes them an instant hit, transforming simple ingredients into edible works of art that capture the spirit of winter. Beyond their captivating appearance, they offer a delightful creamy texture and a sweet, comforting flavor that truly satisfies every palate. But perhaps the biggest draw, especially during the bustling holiday season, is the incredible ease of preparation. There’s no need to turn on the oven, making them a fantastic, mess-free project for families and a stress-free, impressive addition to any party platter. Getting to create these cute little snowmen is half the fun! So, if you’re looking for a delightful, fuss-free treat that embodies the joy of winter, you simply must try our recipe for No Bake Snowman Truffles.html.

Ingredients:
Creating these delightful No Bake Snowman Truffles is a joyous process, and having all your ingredients ready makes it even smoother. Here’s everything you’ll need to bring these festive treats to life:
- For the Truffle Base:
- 1 (14.3-ounce) package golden sandwich cookies (like Golden Oreos), finely crushed
- 8 ounces (1 block) cream cheese, softened to room temperature
- 1/2 teaspoon vanilla extract (optional, but adds a lovely depth)
- For the White Chocolate Coating:
- 24 ounces white candy melts or high-quality white chocolate chips (good quality is key for a smooth finish)
- 1 tablespoon coconut oil or shortening (optional, helps thin the coating for easier dipping)
- For Decoration and Snowman Features:
- 1/4 cup semi-sweet chocolate chips or dark candy melts (for eyes and mouth)
- Small amount of orange candy melts or orange food coloring mixed with white icing (for noses)
- Mini pretzel sticks (for arms)
- Miniature Reese’s Peanut Butter Cups, Rolo candies, or chocolate wafer cookies (for hats)
- Red pull-apart licorice or fruit leather (for scarves)
- Sparkling sugar, desiccated coconut, or edible glitter (for an extra snowy effect)
- Black edible food marker (optional, for very precise details)
- Equipment You’ll Find Handy:
- Food processor (highly recommended for crushing cookies)
- Large mixing bowl
- Rubber spatula or sturdy spoon
- Baking sheets lined with parchment paper or silicone mats
- Microwave-safe bowls or a double boiler setup for melting chocolate
- Small spoons or dipping tools for coating
- Toothpicks or piping bags with very small tips for details
Creating the Irresistible Truffle Base: My Journey to Perfect No Bake Snowman Truffles
The heart of our festive creation, the truffle base, is surprisingly simple to make but incredibly rich and satisfying. This is where we lay the foundation for our charming No Bake Snowman Truffles. I’ve found that getting this step just right ensures a smooth and delicious experience from start to finish. Let’s get started on this creamy, dreamy mixture!
- Prepare Your Cookies: First things first, we need to transform those lovely golden sandwich cookies into fine crumbs. My preferred method for this is using a food processor. Place the entire package of cookies, including the creamy filling, into the food processor. Pulse them repeatedly until they form very fine crumbs. You want a texture akin to fine sand, with no large chunks remaining. This fine consistency is crucial for creating a smooth truffle. If you don’t have a food processor, you can place the cookies in a large, heavy-duty Ziploc bag and crush them with a rolling pin. Just be sure to really work at it until they’re as fine as possible. The finer the crumbs, the smoother your truffle mixture will be, which directly impacts the final texture of your No Bake Snowman Truffles.
- Soften the Cream Cheese: While your cookies are getting crushed, make sure your cream cheese is properly softened. Room temperature cream cheese is non-negotiable for this recipe. If it’s too cold, it won’t blend smoothly with the cookie crumbs, leading to lumps and a less uniform truffle base. I usually take it out of the fridge at least an hour before I plan to start baking (or in this case, “no-baking”). You want it soft enough that you can easily press a spoon into it.
- Combine Ingredients for the Truffle Base: In a large mixing bowl, combine your finely crushed cookie crumbs and the softened cream cheese. If you’re using vanilla extract, add that in now too. I love how a tiny bit of vanilla elevates the flavor profile, adding a warm, subtle note that complements the golden cookies beautifully. Now, it’s time to mix! Use a sturdy rubber spatula or a strong spoon to thoroughly combine the ingredients. This will require a bit of elbow grease, as the mixture will be thick and sticky. Keep folding and pressing until all the cream cheese is fully incorporated into the cookie crumbs, and you have a uniform, dough-like consistency. You’ll know it’s ready when you can press a small amount between your fingers, and it holds its shape without crumbling. This uniform mixture is essential for shaping our snowmen later.
- Chill the Truffle Mixture: This is a critical step for making our No Bake Snowman Truffles easy to work with. Once your truffle mixture is perfectly combined, cover the bowl with plastic wrap and refrigerate it for at least 30 minutes, or even up to an hour. Chilling allows the mixture to firm up, making it much less sticky and significantly easier to roll into shapes. Don’t skip this step, or you’ll find yourself wrestling with a very soft, messy dough! A well-chilled mixture is the secret to perfectly formed snowmen.
Shaping Our Festive Snowman Truffles: Crafting the Perfect Form
Now comes the truly fun part of bringing our vision to life: shaping the snowman bodies! This is where our No Bake Snowman Truffles really start to take their adorable form. Patience and a light touch will be your best friends here. Remember, perfection isn’t the goal; charming character is!
- Prepare Your Workspace: While the truffle mixture is chilling, line a baking sheet with parchment paper or a silicone baking mat. This will be where your shaped truffles will rest before their white chocolate bath. Having this ready ensures a smooth transition once you start shaping.
- Portion the Truffle Mixture: Retrieve your chilled truffle mixture from the refrigerator. For each snowman, you’ll need three distinct balls: one large for the base, one medium for the middle, and one small for the head. I find using a small cookie scoop (about 1 tablespoon capacity) for the medium body, and then adjusting from there, works best for consistency.
- For the large bottom section, scoop out about 1.5 tablespoons of mixture and roll it gently between your palms into a smooth, round ball.
- For the medium middle section, scoop out about 1 tablespoon and roll it into a slightly smaller, smooth ball.
- For the small head section, scoop out about 1/2 tablespoon and roll it into the smallest, smooth ball.
Tip: If the mixture starts to get too sticky while you’re rolling, pop it back into the fridge for 10-15 minutes. Cold hands can also help prevent sticking, so a quick rinse under cold water can be beneficial.
- Assemble the Snowman Bodies: Once you have your three different-sized balls for one snowman, it’s time to assemble. Gently press the medium ball on top of the large ball, applying just enough pressure for them to adhere without squishing the shapes. Then, carefully place the smallest ball on top of the medium ball, again pressing gently. You now have the basic snowman shape! Repeat this process for all your truffle mixture, arranging the assembled snowmen on your prepared baking sheet. Don’t worry if they aren’t perfectly symmetrical; each snowman will have its own unique charm.
- Chill Again: Once all your snowmen are assembled, place the baking sheet back into the refrigerator for another 20-30 minutes. This second chilling period is absolutely vital. It helps the snowman shapes firm up even more, ensuring they hold together robustly when we dip them into the warm white chocolate coating. A well-chilled snowman is a happy snowman that won’t fall apart during the dipping process!
Dipping and Coating: Bringing Our Snowmen to Life with a Smooth Finish
This is where our No Bake Snowman Truffles truly transform into their iconic white form! Dipping requires a little precision and a good melting technique for the white chocolate. A smooth, even coating is key to making them look professional and utterly irresistible.
- Melt the White Chocolate Coating: There are two primary methods for melting your white candy melts or chocolate:
- Microwave Method: Place your white candy melts or chocolate chips in a microwave-safe bowl. Microwave on 50% power for 30-second intervals, stirring thoroughly after each interval. White chocolate can seize or burn easily if overheated, so low and slow is the name of the game. Continue microwaving and stirring until the chocolate is smooth and fully melted. If you’re using coconut oil or shortening to thin it, stir it in during the last minute of melting. This helps achieve a perfectly smooth, dippable consistency.
- Double Boiler Method: If you prefer a more controlled melt, set up a double boiler. Place a heatproof bowl over a saucepan of simmering water, ensuring the bottom of the bowl does not touch the water. Add your white candy melts or chocolate to the bowl. Stir constantly until smooth and melted. Again, if using coconut oil, add it in towards the end.
Regardless of the method, aim for a consistent, silky smooth texture. The chocolate should be warm enough to be liquid but not so hot that it might melt your truffle base.
- Prepare for Dipping: Remove the chilled snowman truffles from the refrigerator. Work with a few at a time, keeping the rest chilled until ready to dip. Have your prepared baking sheet ready nearby.
- Dip Each Snowman: This step requires a steady hand. I find it easiest to use a small spoon or a specialized dipping tool. Gently lower one snowman truffle into the melted white chocolate, ensuring it’s fully submerged. Use the spoon or tool to carefully roll it around until it’s completely coated.
Pro Tip for a Clean Finish: As you lift the snowman out of the chocolate, gently tap the spoon or tool against the side of the bowl. This allows excess chocolate to drip off, preventing puddles at the base and ensuring a smooth, even coat. You can also use a toothpick to gently guide off any drips. - Place on Prepared Baking Sheet: Carefully transfer the coated snowman truffle to your parchment-lined baking sheet. Repeat the dipping process for all remaining snowmen, spacing them out slightly on the baking sheet to prevent them from touching. As you work, if your white chocolate starts to thicken, gently rewarm it in the microwave for a few seconds or over the double boiler until it’s fluid again.
- Allow Coating to Set: Once all your No Bake Snowman Truffles are dipped, let the white chocolate coating set. You can do this at room temperature if your kitchen is cool, which usually takes about 20-30 minutes. However, to speed up the process and ensure a firm set, I usually pop the baking sheet back into the refrigerator for about 10-15 minutes. This creates a beautifully crisp outer shell, perfect for the next stage: decorating!
Decorating Our Charming No Bake Snowman Truffles: Adding Personality and Flair
This is arguably the most delightful part of making No Bake Snowman Truffles – giving each one its unique personality! Be creative and have fun with it. There’s no right or wrong way to decorate; every snowman will be perfectly charming in its own right.
- Prepare Your Decorating Materials: While your white chocolate coating is setting, prepare your decorating elements.
- For eyes and mouth: Melt a small amount of dark chocolate chips or candy melts in a separate small bowl. You can do this in the microwave in 15-second intervals, stirring well. Transfer the melted chocolate to a small piping bag with a tiny tip, a Ziploc bag with a corner snipped off, or simply use a toothpick or the tip of a skewer.
- For noses: Melt a small amount of orange candy melts. Similarly, transfer to a tiny piping bag or use a toothpick. Alternatively, you can mix orange food coloring into a tiny bit of white icing or even cut very small triangles from orange fruit leather.
- For arms: Break mini pretzel sticks into appropriate lengths.
- For hats: Have your miniature Reese’s Peanut Butter Cups, Rolo candies, or chocolate wafer cookies ready.
- For scarves: Cut thin strips of red pull-apart licorice or fruit leather.
- For snowy sparkle: Prepare your sparkling sugar, desiccated coconut, or edible glitter.
- Add the Eyes and Mouth: Once the white chocolate coating is completely set, retrieve your snowmen. Using your prepared dark chocolate (piping bag, Ziploc, or toothpick), carefully pipe two small dots for the eyes on the top (smallest) ball. Then, pipe a series of tiny dots or a curved line for the mouth just below the eyes. Don’t worry if they’re not perfect; a little asymmetry adds character!
- Create the Carrot Nose: Next, apply the orange nose. Using your orange candy melt, pipe a small triangular shape or a tiny dot for the nose just below the eyes, centered between them. If using fruit leather, gently press a small triangle onto the face.
- Attach the Arms: Carefully insert two small pieces of pretzel stick into the sides of the middle truffle ball, simulating arms. Be gentle so you don’t crack the white chocolate coating or dislodge the truffle balls.
- Place the Hat: For the hat, you can either gently press a miniature Reese’s Peanut Butter Cup, Rolo, or a small chocolate wafer cookie directly onto the top of the snowman’s head. If you want it more secure or want to add a “brim,” you can dab a tiny bit of melted white chocolate onto the bottom of the hat before placing it.
- Fashion a Scarf: Take a thin strip of red licorice or fruit leather and gently wrap it around the “neck” (the juncture between the head and middle truffle ball). You can use a tiny dab of melted white chocolate to secure the ends if needed, or simply let it drape naturally.
- Add Snowy Details (Optional): For an extra festive touch, you can sprinkle a little sparkling sugar, desiccated coconut, or edible glitter over the still-wet chocolate details (eyes, mouth, nose) or even very lightly over the entire snowman for a shimmering, snowy effect. If the white chocolate has fully set, you can brush a tiny bit of edible glue or even a tiny amount of corn syrup onto areas you want to glitter, then sprinkle.
- Let Decorations Set: Allow all the piped chocolate decorations to fully set before handling too much. This might take another 5-10 minutes at room temperature, or a quick chill in the fridge if you’re in a hurry.
Final Touches and Storage: Ensuring Your No Bake Snowman Truffles Stay Perfect
You’ve done it! Your charming army of No Bake Snowman Truffles is complete. Now, let’s ensure they are perfectly stored and ready for gifting, serving, or simply enjoying yourself. Proper storage will keep them fresh and delicious for days, preserving all your hard work.
- Allow Final Setting: After all the decorating is complete and the chocolate details are firm to the touch, allow the snowmen to rest for a final few minutes to ensure everything is fully set. This prevents smudges and ensures all the decorative elements are secure before moving them.
- Careful Handling: When moving your finished No Bake Snowman Truffles, handle them gently by the base or sides. The pretzel arms and hats can be delicate, so a light touch is best to keep them intact.
- Storage: The best way to store these festive treats is in an airtight container in the refrigerator. Due to the cream cheese in the truffle base, refrigeration is essential to maintain their freshness and texture. Arranging them in a single layer, separated by parchment paper if stacking, will prevent them from sticking together or damaging their delicate decorations.
How Long Do They Last? When stored properly in the refrigerator, your No Bake Snowman Truffles will stay fresh and delicious for up to 1-2 weeks. This makes them an excellent make-ahead treat for holiday parties or gifts. - Serving Temperature: While they must be stored in the refrigerator, I find these truffles are best enjoyed at a slightly cooler than room temperature. Take them out of the fridge about 15-20 minutes before serving. This allows the truffle base to soften just slightly, enhancing its creamy texture, while the white chocolate coating remains firm.
- Gifting Your No Bake Snowman Truffles: These make wonderful homemade gifts! Arrange them in festive boxes lined with tissue paper or small cellophane bags tied with a ribbon. Just remind the recipient to keep them refrigerated. They’re a delightful and personal touch for anyone special during the holiday season.
- Enjoy the Compliments! Prepare for an avalanche of compliments! These No Bake Snowman Truffles are not just a treat for the taste buds but also a feast for the eyes. They bring a cheerful, festive spirit to any gathering and are always a conversation starter. Enjoy every delightful bite of your homemade creations!
Conclusion:
Well, my friends, we’ve journeyed through the simple, delightful process of creating what I truly believe will become a staple in your holiday treat repertoire. If there’s one recipe you absolutely must try this season, it’s these incredible truffles. They’re more than just a sweet bite; they’re a tiny package of pure joy, guaranteed to bring smiles to faces of all ages. What makes them so utterly irresistible and a definite must-make? For starters, the clue is in the name itself: no baking required! That means less time fussing over ovens and more time enjoying the festive spirit, perfect for those bustling holiday schedules.
Beyond the sheer convenience, the charm of these truffles is undeniable. Each one is a miniature work of edible art, transforming simple ingredients into an adorable, characterful snowman.
The process is incredibly forgiving and wonderfully kid-friendly,
making it an ideal activity for family bonding. Imagine the laughter and creativity as little hands (or big ones!) help assemble the delightful faces and tiny scarves. They’re sweet, creamy, and have that perfect melt-in-your-mouth texture that chocolate and cookie lovers dream of. They truly encapsulate the magic of the holidays in a delicious, approachable way, proving that the most memorable treats don’t always need to be complex or time-consuming. From a spontaneous gathering to a meticulously planned holiday feast, these truffles effortlessly elevate any occasion with their whimsical appeal and delightful flavor. They offer that perfect balance of indulgent sweetness without the heavy feeling, making them ideal for nibbling after a big meal or as a delightful pick-me-up during a festive afternoon.
Now that you’re convinced these are a must-try, let’s talk about how to truly make them shine on your holiday table or perhaps how to put your own unique spin on them. When it comes to serving, these delightful snowmen are incredibly versatile.
Imagine them arranged artfully on a festive platter
alongside other holiday cookies and candies, instantly becoming the star of the dessert spread. They also make charming edible gifts! Package a few in clear cellophane bags tied with a pretty ribbon, or nestle them into small decorative boxes for a thoughtful, handmade present that friends, neighbors, and teachers will absolutely adore. They’re also perfect as party favors for a winter-themed birthday or holiday gathering, sending guests home with a sweet reminder of the joyous celebration. For a touch of elegance, consider placing each snowman in a mini cupcake liner on your dessert tray.
But don’t stop there! The beauty of a recipe like this lies in its adaptability. While I’ve shared my favorite way to make them, feel free to unleash your inner culinary artist with these variations. Consider different flavor profiles for the truffle base; a hint of peppermint extract could transform them into a mint chocolate dream, or a touch of almond extract could add a sophisticated nutty note. Orange zest grated into the mix would offer a bright, citrusy counterpoint to the sweetness. For the ‘snow’ coating, white chocolate is classic, but you could experiment with a light dusting of powdered sugar for a softer look, or even add a touch of edible glitter for extra sparkle. As for decorations, let your imagination run wild! Tiny pretzel stick arms, mini chocolate chip buttons, or even different colored candies for hats and scarves can give each snowman its own unique personality.
You can even skip the snowman shaping entirely
if you’re short on time and simply roll them into festive ‘snowball’ truffles, decorating them with holiday sprinkles for a quick, equally delicious treat. Just remember to keep them chilled until serving to maintain their perfect shape and texture. This flexibility ensures that these truffles can be tailored perfectly to your taste and time constraints, making them an even more invaluable addition to your seasonal baking (or rather, no-baking!) repertoire.
So, what are you waiting for? I genuinely hope you’re feeling inspired to roll up your sleeves – metaphorically speaking, since there’s no messy flour involved! – and give these delightful No Bake Snowman Truffles a try. I promise you, the joy of creating these adorable treats is rivaled only by the pleasure of eating them. They are fantastic for adding a touch of festive cheer to any occasion, and their simplicity means even novice treat-makers can achieve impressive results.
Embrace the fun, savor the sweetness, and make some magical memories
with this wonderful recipe. I am absolutely thrilled to imagine all of your charming snowmen coming to life in kitchens everywhere. Once you’ve made your batch, please don’t keep them a secret! I would absolutely love to hear about your experience. Did you try a new flavor variation? Did your kids get involved in the decorating? Which candy hat was your favorite? Share your triumphs, your creative twists, and even your funny mishaps in the comments below or wherever you share your culinary adventures. Your stories and photos are truly the best part of sharing recipes like this, and they inspire me and countless other home cooks. Let’s spread some holiday cheer, one delightful snowman truffle at a time!
Adorable No Bake Snowman Truffles
These charming no-bake snowman truffles bring whimsical winter magic to your holiday table without the stress of oven baking. Easy to make with creamy golden sandwich cookies and cream cheese, coated in white chocolate, and decorated with festive features, they are a delightful, stress-free treat for all ages.
Ingredients
Instructions
Important Information
Nutrition Facts (Per Serving)
It is important to consider this information as approximate and not to use it as definitive health advice.
Allergy Information
Please check ingredients for potential allergens and consult a health professional if in doubt.

Leave a Comment