


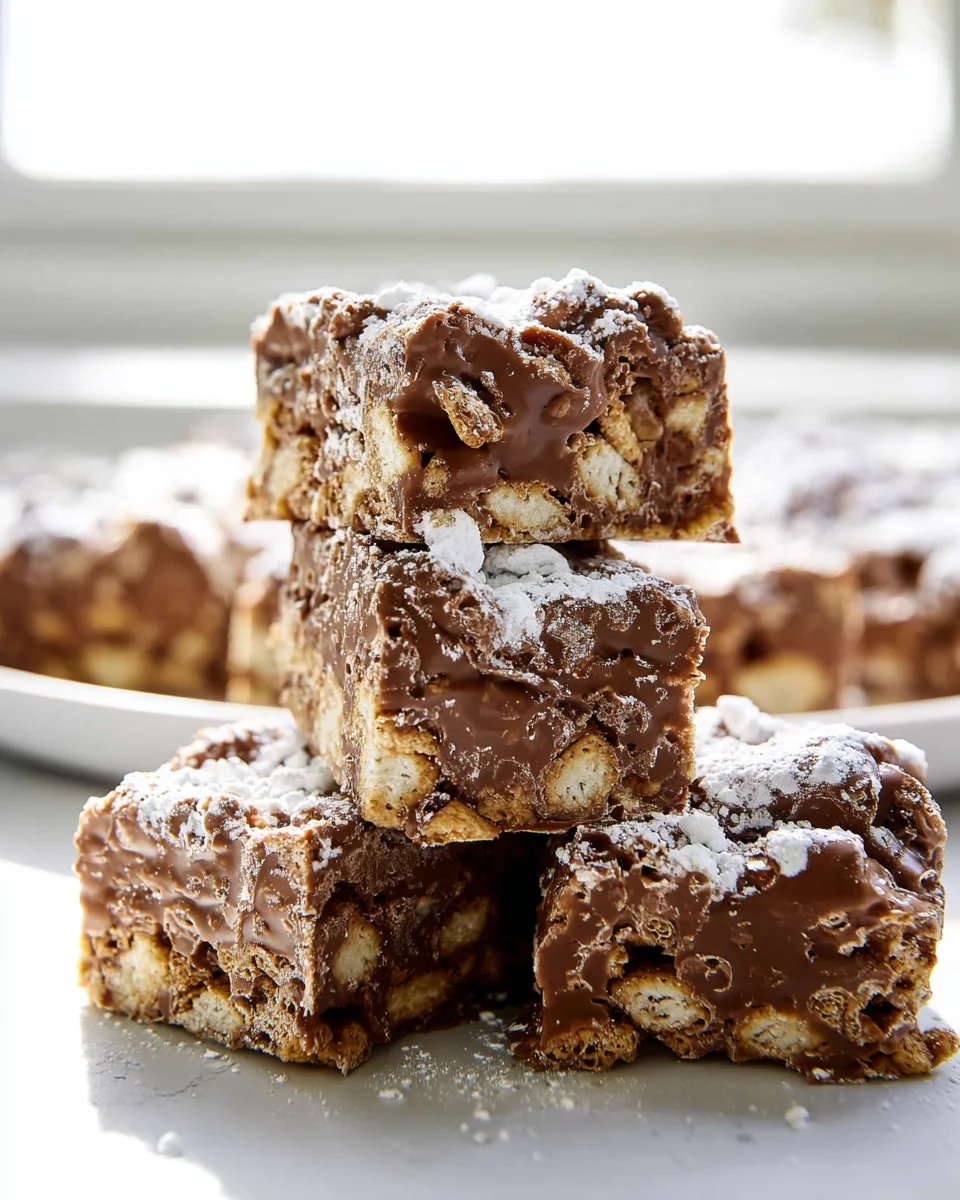
Puppy Chow Bars are about to revolutionize your dessert game, transforming a nostalgic, finger-licking snack into an elegant, easy-to-handle treat that everyone will adore. Remember that iconic blend of crispy cereal, rich chocolate, creamy peanut butter, and a generous dusting of powdered sugar? Imagine all that irresistible flavor and texture, but pressed into a neat, sliceable bar, perfect for sharing without the usual mess. This delightful adaptation takes the beloved “Puppy Chow” (also known as Muddy Buddies) from its snack mix origins, often a staple at holiday gatherings, potlucks, and casual parties since its surge in popularity in the mid-20th century, and elevates it to new heights of convenience.
People absolutely adore this dish because it delivers an unparalleled symphony of tastes and textures: the satisfying crunch of cereal, the luxurious melt of chocolate and peanut butter, all balanced by the sweet, powdery finish. It’s a no-bake wonder, making it incredibly simple to whip up for last-minute guests or when you need a quick fix for your sweet tooth.
No more sticky fingers; just pure, unadulterated enjoyment in every bite.
These Puppy Chow Bars offer the ultimate combination of childhood nostalgia and grown-up practicality, ensuring they’ll disappear from the plate faster than you can say “more, please!”

Ingredients:
- For the Cereal Base:
- 12 cups (about 1 box, 12.8 oz) Chex cereal (Rice, Corn, or Wheat Chex work beautifully, or a combination!)
- For the Chocolate-Peanut Butter Coating:
- 1 cup (2 sticks) unsalted butter
- 1 cup creamy peanut butter (I find that regular creamy peanut butter, not natural, works best here for consistency)
- 1 (12-ounce) package semi-sweet chocolate chips (about 2 cups)
- 1 teaspoon pure vanilla extract
- For the Powdered Sugar Coating:
- 3 cups powdered sugar (also known as confectioners’ sugar)
Equipment You’ll Need:
Before we dive into creating these irresistible Puppy Chow Bars, let’s gather our tools to ensure a smooth and enjoyable cooking experience. Having everything ready beforehand makes the process much more efficient and fun!
- A large, sturdy mixing bowl (preferably one with a lid, or a large ziploc bag, for shaking)
- A large saucepan or a microwave-safe bowl (for melting the chocolate mixture)
- A 9×13 inch baking pan (glass or metal works great)
- Parchment paper or aluminum foil
- Non-stick cooking spray or extra butter for greasing the pan
- Measuring cups and spoons
- A sturdy spatula or wooden spoon
- A sharp knife for cutting the bars
- A cooling rack (optional, but helpful for cooling after cutting)
Getting Started: Prepping Your Pan for Puppy Chow Bars
- Prepare Your Baking Pan: First things first, we want to ensure our delightful Puppy Chow Bars don’t stick to the pan when it’s time to cut them. Take your 9×13 inch baking pan and line it completely with parchment paper or aluminum foil. Make sure to leave an overhang on the sides – this will act as “handles” later, making it super easy to lift the entire slab of Puppy Chow Bars out of the pan.
- Grease the Lining: Even with parchment paper, I like to give it an extra layer of non-stick security. Lightly spray the parchment paper or foil with non-stick cooking spray, or use a small pat of butter to grease it. This tiny step makes a big difference when you’re trying to achieve perfectly clean cuts. Setting up your pan properly is the foundation for perfect Puppy Chow Bars!
Crafting the Cereal Base for Your Puppy Chow Bars
- Measure Out Your Cereal: Grab your giant mixing bowl. Carefully measure out 12 cups of your chosen Chex cereal. Whether you’re going for classic Rice Chex, sturdy Corn Chex, or a nutty Wheat Chex, they all provide that perfect crispy canvas for our coating. Gently pour the cereal into the large mixing bowl. The key here is “gently” – we want to keep those delicate squares as intact as possible. Crushed cereal isn’t the end of the world, but whole pieces make for a much more satisfying crunch in your finished Puppy Chow Bars. Set this bowl aside for now.
The Melted Magic: Creating the Chocolate-Peanut Butter Coating
- Combine Butter and Peanut Butter: In a medium saucepan over low to medium heat, or in a large microwave-safe bowl, combine the 1 cup (2 sticks) of unsalted butter and 1 cup of creamy peanut butter. If you’re using a saucepan, stir constantly to prevent scorching. If you’re using the microwave, heat in 30-second intervals, stirring well after each interval, until the mixture is smooth and completely melted. This typically takes about 1 to 2 minutes in the microwave, but it can vary.
- Introduce the Chocolate Chips: Once the butter and peanut butter mixture is smooth and melted, remove it from the heat (if using a saucepan) or the microwave. Immediately add the 1 (12-ounce) package of semi-sweet chocolate chips to the hot mixture. Let it sit for about 1-2 minutes without stirring. This allows the residual heat to begin melting the chocolate chips gently.
- Stir Until Silky Smooth: After the brief resting period, start stirring the chocolate mixture with your spatula or spoon. Continue stirring until all the chocolate chips are fully melted and incorporated, creating a luxurious, glossy, and smooth chocolate-peanut butter coating. It should be utterly uniform, with no lumps of un-melted chocolate. This smooth consistency is crucial for an even coating on our cereal, ensuring every bite of your Puppy Chow Bars is packed with flavor.
- Add Vanilla Extract: Finally, stir in the 1 teaspoon of pure vanilla extract. Vanilla adds a wonderful depth of flavor that complements the chocolate and peanut butter perfectly, enhancing the overall deliciousness of your Puppy Chow Bars. Give it one last good stir to ensure the vanilla is evenly distributed.
Combining the Coating and Cereal: The Heart of Puppy Chow Bars
- Pour Coating Over Cereal: Now for the fun part! Carefully pour the warm, silky chocolate-peanut butter mixture evenly over the measured Chex cereal in your large mixing bowl. Try to distribute it as much as possible over the entire surface of the cereal.
- Gently Toss to Coat: Using your sturdy spatula or wooden spoon, gently fold and toss the cereal. The goal here is to coat every single piece of cereal with the delicious chocolate-peanut butter mixture without crushing the delicate squares. Take your time, being patient and thorough. You might need to gently scrape the bottom and sides of the bowl to ensure all the coating gets distributed. Continue this gentle tossing until every piece of cereal is beautifully enrobed in the chocolatey goodness. This stage is key to achieving that signature flavor and texture in your Puppy Chow Bars.
The Powdered Sugar Snowfall: Achieving That Classic Puppy Chow Look
- Prepare for the Powdered Sugar: Once your cereal is thoroughly coated, it’s time for the signature “dusting” that makes Puppy Chow, well, Puppy Chow! You have a couple of options here:
- Option A (My Preferred Method): Transfer the coated cereal into a very large (2-gallon size) resealable plastic bag. This method is incredibly efficient for coating and creates minimal mess.
- Option B: If you don’t have a large bag, you can return the cereal to your large mixing bowl, especially if it has a lid.
- Add the Powdered Sugar: Carefully pour all 3 cups of powdered sugar into the bag with the cereal, or into the bowl.
- Shake, Shake, Shake!:
- Using a Bag: Seal the bag tightly, making sure there’s plenty of air inside to allow the cereal to tumble freely. Then, shake the bag vigorously, gently at first, then more enthusiastically, for several minutes. The goal is to evenly coat every single piece of chocolate-covered cereal with a thick, white layer of powdered sugar. Peeking periodically to check on the coverage is a good idea. Continue shaking until you see no more wet, dark spots and all the cereal pieces look snowy white. This thorough coating is essential for the classic Puppy Chow experience.
- Using a Bowl: If using a bowl with a lid, place the lid on securely and shake the bowl in a similar fashion. If your bowl doesn’t have a lid, you can stir the powdered sugar in with a spoon, gently folding until everything is coated. This method might require a bit more patience and could be slightly messier, but it absolutely works!
The result should be a beautiful, powdered-sugar-dusted concoction, ready to be transformed into your amazing Puppy Chow Bars.
Transforming into Bars: Pressing and Chilling
- Transfer to Prepared Pan: Once the cereal is perfectly coated with powdered sugar, carefully pour or spoon the entire mixture into your prepared 9×13 inch baking pan.
- Press Firmly and Evenly: Using the back of your spatula, a flat bottomed glass, or even your clean hands, firmly and evenly press the mixture down into the pan. You want to compact it well so that the Puppy Chow Bars hold their shape when cut. Pay attention to the corners and edges to ensure an even thickness throughout the pan. The more compact you make it, the less crumbly your bars will be. This step is crucial for the structural integrity of your Puppy Chow Bars.
- Chill for Setting: Once pressed, cover the pan lightly with plastic wrap or aluminum foil. Transfer the pan to the refrigerator and chill for at least 2 to 3 hours. For the best results and easiest cutting, I often let it chill for 4 hours or even overnight. Chilling allows the chocolate and peanut butter to firm up completely, binding all those delicious pieces together into solid, ready-to-cut Puppy Chow Bars. Patience truly pays off in this stage!
Cutting and Serving Your Delightful Puppy Chow Bars
- Lift from Pan: Once thoroughly chilled and firm, remove the pan from the refrigerator. Use the parchment paper or foil overhangs you left earlier as handles to carefully lift the entire slab of Puppy Chow Bars out of the pan and onto a cutting board.
- Cut into Bars: Using a sharp knife, trim off any uneven edges (chef’s treat!). Then, cut the slab into your desired size of bars. I typically aim for 1-inch by 2-inch rectangles, but squares or even larger pieces work too, depending on how generous you’re feeling! Wipe your knife clean between cuts if it starts to get sticky to ensure clean, neat Puppy Chow Bars.
- Serve and Enjoy: Arrange your beautiful Puppy Chow Bars on a platter and watch them disappear! These are fantastic for parties, lunchbox treats, or just an afternoon pick-me-up.
Tips and Tricks for Perfect Puppy Chow Bars:
Making Puppy Chow Bars is a delightful experience, and with a few extra pointers, you can elevate your creation to new heights. Here are some of my favorite tips:
- Don’t Rush the Chill Time: I cannot stress this enough! The chilling period is absolutely critical for the Puppy Chow Bars to set properly. If you cut them too soon, they will be crumbly and won’t hold their bar shape. Give them ample time in the fridge, ideally 3-4 hours, or even overnight for the best results. A well-chilled bar is a perfect bar.
- Vary Your Chex Cereal: While Rice Chex is classic, don’t be afraid to experiment! Corn Chex offers a slightly different texture and flavor profile, and Wheat Chex adds a wholesome touch. You can even use a mix of different Chex cereals for added complexity and visual interest in your Puppy Chow Bars. Each type absorbs the coating a little differently, leading to subtle variations in the final product.
- Quality Ingredients Matter: Since there are so few ingredients, the quality really shines through. Use good quality butter, a reputable brand of semi-sweet chocolate chips, and a creamy peanut butter you genuinely enjoy eating. These choices will directly impact the rich flavor of your Puppy Chow Bars.
- Storage is Key: Store your finished Puppy Chow Bars in an airtight container at room temperature for up to 3-4 days, or in the refrigerator for up to a week. If you stack them, you might want to place a piece of parchment paper between layers to prevent sticking. They’re also freezer-friendly! Simply place them in a freezer-safe container for up to 2-3 months. Thaw at room temperature for a few minutes before serving.
- Make It Your Own with Add-ins: Want to get creative? After the cereal is coated with the chocolate-peanut butter mixture (before the powdered sugar), you can gently fold in some fun add-ins. Think mini marshmallows, chopped pretzels for extra crunch, or even a handful of M&M’s for color and chocolatey bites. Just remember that these additions might slightly alter the texture and how uniformly the bars hold together, but they can add a delightful twist to your Puppy Chow Bars.
- Prevent Crushing the Cereal: When stirring the coating into the cereal, be gentle. Use a folding motion rather than aggressive stirring. This preserves the integrity of the Chex squares, giving your Puppy Chow Bars that satisfying, light crunch.
- For an Extra Powdered Sugar Punch: If you love a super-generous coating of powdered sugar, you can add an extra ½ to 1 cup of powdered sugar to the bag/bowl. Sometimes a second light shake just before serving can revive that fresh, snowy look, especially if they’ve been stored for a while.
These Puppy Chow Bars are a no-bake wonder, perfect for satisfying that sweet tooth without ever turning on your oven. Enjoy creating and sharing these delightful treats!
Conclusion:
If there’s one recipe I genuinely hope you take the time to try, it’s this one. What makes these delightful treats an absolute must-bake (or rather, must-make, since no oven is required!) is their incredible simplicity paired with an undeniable, crowd-pleasing deliciousness. I’ve found that in a world of complex desserts, there’s a unique joy in something so straightforward yet so utterly satisfying. From the moment you stir together that luscious chocolate-peanut butter coating to the final shake in powdered sugar, you’re creating not just a snack, but a little piece of edible happiness. They strike that perfect balance of crunchy, chewy, and melt-in-your-mouth sweet, hitting every nostalgic note you could wish for. These aren’t just a dessert; they’re a ticket to smiles, a guaranteed hit at any gathering, and quite possibly, your new favorite no-bake indulgence. They truly embody everything wonderful about a quick, comforting treat that appeals to every age group, from the littlest snackers to the grown-ups who appreciate a touch of childhood magic.
One of the beautiful things about this recipe is its versatility, both in how you serve it and how you can adapt it to your own tastes or what you have on hand. While they are undeniably perfect enjoyed at room temperature, perhaps with a tall glass of cold milk or a warm cup of coffee, don’t hesitate to experiment! I’ve found that a slightly chilled bar offers a firmer bite, making them a fantastic portable snack for picnics or lunchboxes. Imagine crumbling a few pieces over a scoop of vanilla ice cream for an instant sundae upgrade, or arranging them on a festive platter alongside fresh berries and other bite-sized sweets for an impressive dessert spread. And for those who love to put their own spin on things, the possibilities for variations are practically endless! If you’re looking for a gluten-free option, simply switch to a certified gluten-free rice cereal. For different flavor profiles, consider using almond butter or sunflower seed butter instead of peanut butter, or swap out half of the chocolate chips for white chocolate, butterscotch, or even dark chocolate for a richer taste. Want to add a pop of color or extra texture? Stir in some mini M&M’s, colorful sprinkles, shredded coconut, or even finely chopped pecans or walnuts to the mixture before pressing it into the pan. For a seasonal twist, a dash of peppermint extract around the holidays or a sprinkle of pumpkin spice in the fall can transform these classic bars into something uniquely festive. I’ve even seen people press them into fun cookie cutter shapes before they set for a whimsical touch that kids absolutely adore.
Now, It’s Your Turn!
I genuinely urge you, from the bottom of my heart, to give these a try. Seriously, you won’t regret it. The process is so simple, so forgiving, and so rewarding that it’s almost meditative. There’s an undeniable satisfaction that comes from creating something so universally loved with such minimal effort. Whether you’re making them for a party, a quiet movie night in, or simply to treat yourself to something sweet, the joy they bring is immense. These Puppy Chow Bars are more than just a recipe; they’re an experience waiting to happen, a guaranteed mood-lifter, and a conversation starter. I’d absolutely love to hear how your batch turns out! Did you stick to the classic? Did you venture into creative variations? What did your family and friends think? Please, don’t be shy – share your stories, your photos, and your tips. There’s nothing I enjoy more than hearing about your culinary adventures and seeing the delicious results of our shared love for great food. Happy making, and even happier eating!
No-Bake Puppy Chow Bars
These No-Bake Puppy Chow Bars transform the classic crispy cereal, chocolate, and peanut butter snack into a neat, sliceable treat. Easy to make with a satisfying crunch and sweet finish, perfect for sharing without the usual mess.
Ingredients
Instructions
Important Information
Nutrition Facts (Per Serving)
It is important to consider this information as approximate and not to use it as definitive health advice.
Allergy Information
Please check ingredients for potential allergens and consult a health professional if in doubt.
Leave a Comment