

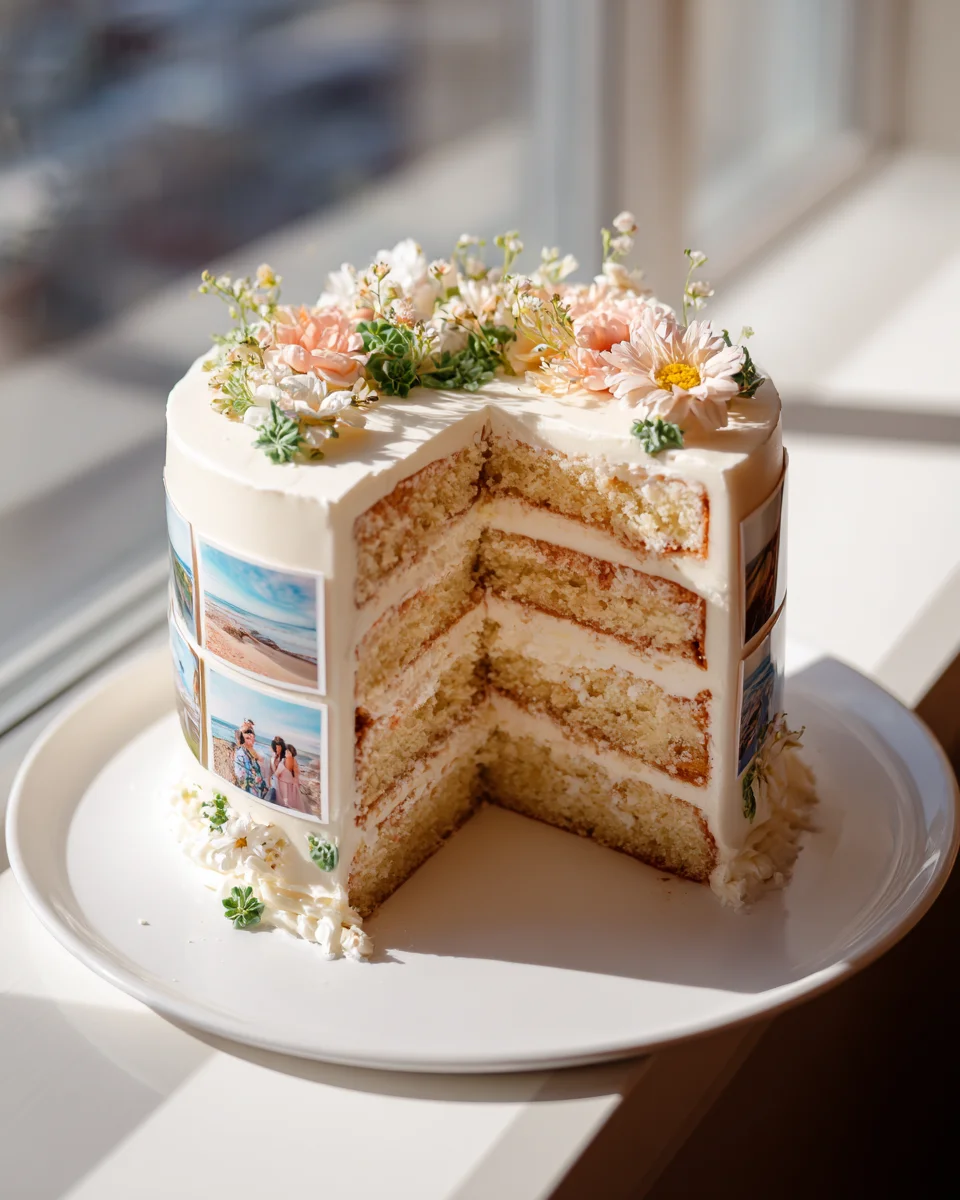
As I flipped through the pages of my high school yearbook, I was swept back to a whirlwind of memories—late-night study sessions, laughter echoing through the hallways, and the bittersweet anticipation of graduation. It was then that I decided to create something special for my daughter’s senior year celebration: the Senior Year Photo Collage Cake with Edible Printed Memories. This cake is more than just a dessert; it’s a vibrant tapestry of her journey, immortalized in sweet, delicious layers.
Picture this: a towering cake, each layer adorned with stunning edible prints showcasing her favorite moments—her first dance, the prom, and candid shots with friends. The aroma of freshly baked vanilla cake wafts through the air, mingling with the rich scent of creamy buttercream. As I slice into it, the layers reveal a rainbow of colors, each bite bursting with flavor and nostalgia. The soft, moist cake melts in your mouth, while the sweet prints add a playful touch that makes every slice a trip down memory lane.
This recipe is special because it combines the joy of baking with the sentimentality of cherished memories. My version stands out by incorporating layers of flavored fillings—think raspberry and lemon zest—adding a delightful twist to the traditional cake. It’s not just about taste; it’s about celebrating milestones in a delicious, visually stunning way.
Let me show you exactly how to make this unforgettable cake that will surely steal the spotlight at any celebration!

Why You’ll Love This Recipe
- Features a rich, buttery cake with a delicate crumb that pairs beautifully with the light and fluffy buttercream frosting.
- Incorporates edible printed memories, allowing you to personalize the cake with cherished photos from the senior’s year.
- Ready in about 2 hours, including baking and decorating, making it a manageable project for any celebration.
- Cost-effective, with most ingredients available in your pantry, ensuring a stunning cake without breaking the bank.
- Perfect for any occasion—graduation parties, milestone celebrations, or simply to honor a significant year.
Ingredients
- 3 cups all-purpose flour
- 2 ½ cups granulated sugar
- 1 cup unsalted butter (softened, at room temperature)
- 1 cup whole milk (room temperature)
- 5 large eggs (room temperature)
- 1 tablespoon baking powder
- 1 teaspoon baking soda
- 1 teaspoon salt
- 2 tablespoons vanilla extract
- 1 cup unsalted butter (softened, at room temperature)
- 4 cups powdered sugar
- 2 tablespoons heavy cream
- 1 teaspoon vanilla extract
- Food coloring (optional, for coloring the frosting)
- Edible ink printer (and edible printer paper)
- Photos printed on edible paper (choose memorable photos from the senior’s year)
- Edible glitter (optional)
- Fresh flowers or sprinkles (optional)
Let’s break down some key ingredients. The all-purpose flour provides structure and a tender crumb, making it essential for a cake that holds its shape. When selecting flour, opt for a brand with a higher protein content for a firmer texture. If you’re in a pinch, cake flour can be a great substitute for an even softer cake.
The unsalted butter plays a significant role in flavor and moisture. It should be softened to room temperature to create a creamy, fluffy frosting. If you’re looking for a dairy-free option, vegan butter can work just as well. Lastly, the edible printed memories bring a unique personal touch, so choose high-quality images to ensure they print beautifully on edible paper.
Step-by-Step Instructions
- Preheat your oven to 350°F (175°C). This ensures an even bake while you prepare the batter.
- In a large mixing bowl, cream together 1 cup of softened unsalted butter and 2 ½ cups of granulated sugar until the mixture is light and fluffy—about 3-4 minutes. You’ll know it’s ready when it has doubled in size and looks pale yellow.
- Add in the 5 large eggs one at a time, mixing well after each addition. This helps to incorporate air into the batter, resulting in a lighter cake.
- Stir in 2 tablespoons of vanilla extract. The aroma should be delightful and fragrant, which enhances the overall flavor.
- In another bowl, whisk together 3 cups of all-purpose flour, 1 tablespoon of baking powder, 1 teaspoon of baking soda, and 1 teaspoon of salt. This ensures even distribution of the leavening agents.
- Gradually add the dry ingredients to the wet mixture, alternating with 1 cup of room temperature whole milk. Start and end with the flour mixture, mixing just until combined to avoid overmixing.
- Grease and flour two 9-inch round cake pans. Divide the batter evenly between the pans and smooth the tops using a spatula.
- Bake in the preheated oven for 25-30 minutes. Check for doneness by inserting a toothpick into the center; it should come out clean or with a few crumbs attached.
- Once baked, allow the cakes to cool in the pans for 10 minutes before transferring them to a wire rack to cool completely. This prevents the cakes from becoming soggy.
- While the cakes cool, prepare the buttercream frosting by beating 1 cup of softened unsalted butter until creamy. Gradually add 4 cups of powdered sugar, mixing on low until incorporated, then add 2 tablespoons of heavy cream and 1 teaspoon of vanilla extract. Beat until fluffy, about 5 minutes.
- When the cakes are completely cool, level the tops with a serrated knife for easy stacking. Place one layer on your serving platter, spread a layer of frosting on top, and carefully place the second layer on top.
- Frost the entire cake with the remaining buttercream, smoothing the surface. Use a spatula or cake scraper for a polished finish.
- Print your selected photos on edible paper using an edible ink printer. Cut them out and gently place them on the frosted cake. Decorate with edible glitter, fresh flowers, or sprinkles as desired.
Pro Tips for the Best Senior Year Photo Collage Cake With Edible Printed Memories
- One common mistake is overmixing the batter once the flour is added. This can lead to a dense cake. Mix just until combined for a light, airy texture.
- When using an edible ink printer, ensure you have the right edible ink and paper for the best results. Test print on regular paper first to check the sizing.
- For a more vibrant frosting, consider the ratios of butter to sugar. More butter will yield a creamier frosting, while a higher sugar content gives a stiffer consistency, perfect for intricate designs.
- Use a cake leveler for a perfect flat top. This small investment can make a huge difference in the appearance of your finished cake.
Variations & Serving Ideas
If you’re looking to mix things up, consider these variations:
1. Chocolate Version: Substitute 1 cup of flour with cocoa powder for a delicious chocolate cake.
2. Fruit Infusion: Add 1 cup of fresh berries or diced bananas into the batter for a fruity twist.
3. Gluten-Free Option: Use a gluten-free all-purpose flour blend in place of regular flour for a gluten-free cake.
4. Seasonal Flavors: Incorporate spices like cinnamon or pumpkin spice for a fall-themed cake.
As for serving ideas, pair this cake with a refreshing fruit salad to balance out the richness, or some vanilla ice cream for a classic combination. A light sorbet can also offer a refreshing contrast. Lastly, consider serving it with a cup of coffee or tea, as the flavors complement each other perfectly.
Storage, Make-Ahead & Reheating
Your Senior Year Photo Collage Cake can be stored in an airtight container in the refrigerator for up to 5 days. If you wish to freeze it, wrap individual slices in plastic wrap and place them in a freezer-safe bag; it will keep well for up to 3 months. To reheat, place a slice in the microwave for about 15-20 seconds, just until warm. Interestingly, this cake often tastes better the next day, as the flavors have more time to develop and meld together.
Frequently Asked Questions
Can I make Senior Year Photo Collage Cake With Edible Printed Memories ahead of time?
Yes — in fact, it tastes even better the next day as the flavors meld. You can bake the cakes a day in advance and frost them the day of your event for optimal freshness.
What can I use instead of an edible ink printer?
If you don’t have access to an edible ink printer, you can use store-bought edible icing sheets that feature pre-printed designs or photographs, allowing you to personalize the cake without the need for special equipment.
How do I prevent my cake from sticking to the pan?
Ensure that you thoroughly grease and flour your pans before adding the batter. You can also line the bottoms with parchment paper for extra protection against sticking.
Is it possible to make this cake vegan?
Yes! You can substitute the eggs with flaxseed meal (1 tablespoon of flaxseed mixed with 2.5 tablespoons of water equals one egg) and use a plant-based butter and non-dairy milk to create a delicious vegan version.
What type of edible printer do you recommend?
Look for printers specifically designed for edible printing, such as the Canon PIXMA series. They are user-friendly and yield high-quality prints when used with the correct edible ink and paper.
Final Thoughts
The Senior Year Photo Collage Cake With Edible Printed Memories is more than just a dessert; it’s a heartfelt tribute to cherished moments, celebrating the milestones of life in the most delicious way. The combination of rich flavors and personal memories makes each slice a delightful experience that’s sure to spark nostalgia and joy.
This is the kind of recipe I come back to again and again, especially when I want to create something meaningful for friends and family. It’s a wonderful way to blend creativity with love, making any gathering feel extra special.
I encourage you to try making this cake for your next celebration. Don’t hesitate to put your own spin on the design or flavors—after all, the best memories are those we create together. Share your results and inspire others to craft their own edible memories!

Senior Year Photo Collage Cake: Edible Memories Delight
- Total Time: 1 hour
- Yield: 12 servings 1x
Description
Celebrate cherished moments with this vibrant Senior Year Photo Collage Cake, layered with delicious flavors and adorned with edible printed memories. It’s a heartfelt tribute to milestones, perfect for any celebration.
Ingredients
- 3 cups all-purpose flour
- 2 ½ cups granulated sugar
- 1 cup unsalted butter (softened, at room temperature)
- 1 cup whole milk (room temperature)
- 5 large eggs (room temperature)
- 1 tablespoon baking powder
- 1 teaspoon baking soda
- 1 teaspoon salt
- 2 tablespoons vanilla extract
- 1 cup unsalted butter (softened, at room temperature)
- 4 cups powdered sugar
- 2 tablespoons heavy cream
- 1 teaspoon vanilla extract
- Food coloring (optional, for coloring the frosting)
- Edible ink printer (and edible printer paper)
- Photos printed on edible paper (choose memorable photos from the senior's year)
- Edible glitter (optional)
- Fresh flowers or sprinkles (optional)
Instructions
- Preheat your oven to 350°F (175°C). This ensures an even bake while you prepare the batter.
- In a large mixing bowl, cream together 1 cup of softened unsalted butter and 2 ½ cups of granulated sugar until the mixture is light and fluffy—about 3-4 minutes.
- Add in the 5 large eggs one at a time, mixing well after each addition.
- Stir in 2 tablespoons of vanilla extract.
- In another bowl, whisk together 3 cups of all-purpose flour, 1 tablespoon of baking powder, 1 teaspoon of baking soda, and 1 teaspoon of salt.
- Gradually add the dry ingredients to the wet mixture, alternating with 1 cup of room temperature whole milk.
- Grease and flour two 9-inch round cake pans. Divide the batter evenly between the pans and smooth the tops using a spatula.
- Bake in the preheated oven for 25-30 minutes. Check for doneness by inserting a toothpick into the center.
- Once baked, allow the cakes to cool in the pans for 10 minutes before transferring them to a wire rack to cool completely.
- While the cakes cool, prepare the buttercream frosting by beating 1 cup of softened unsalted butter until creamy.
- Gradually add 4 cups of powdered sugar, mixing on low until incorporated, then add 2 tablespoons of heavy cream and 1 teaspoon of vanilla extract.
- When the cakes are completely cool, level the tops with a serrated knife for easy stacking.
- Place one layer on your serving platter, spread a layer of frosting on top, and carefully place the second layer on top.
- Frost the entire cake with the remaining buttercream, smoothing the surface.
- Print your selected photos on edible paper using an edible ink printer. Cut them out and gently place them on the frosted cake. Decorate with edible glitter, fresh flowers, or sprinkles as desired.
- Prep Time: 30 mins
- Cook Time: 30 mins
- Category: Dessert
- Method: Baking
- Cuisine: American
Nutrition
- Serving Size: 1 slice
- Calories: 450
- Sugar: 45 g
- Sodium: 200 mg
- Fat: 20 g
- Saturated Fat: 12 g
- Unsaturated Fat: 8 g
- Trans Fat: 0 g
- Carbohydrates: 60 g
- Fiber: 1 g
- Protein: 4 g
- Cholesterol: 100 mg
Keywords: Mix just until combined to avoid a dense cake. Ensure you have the right edible ink and paper for the best results.
Leave a Comment