

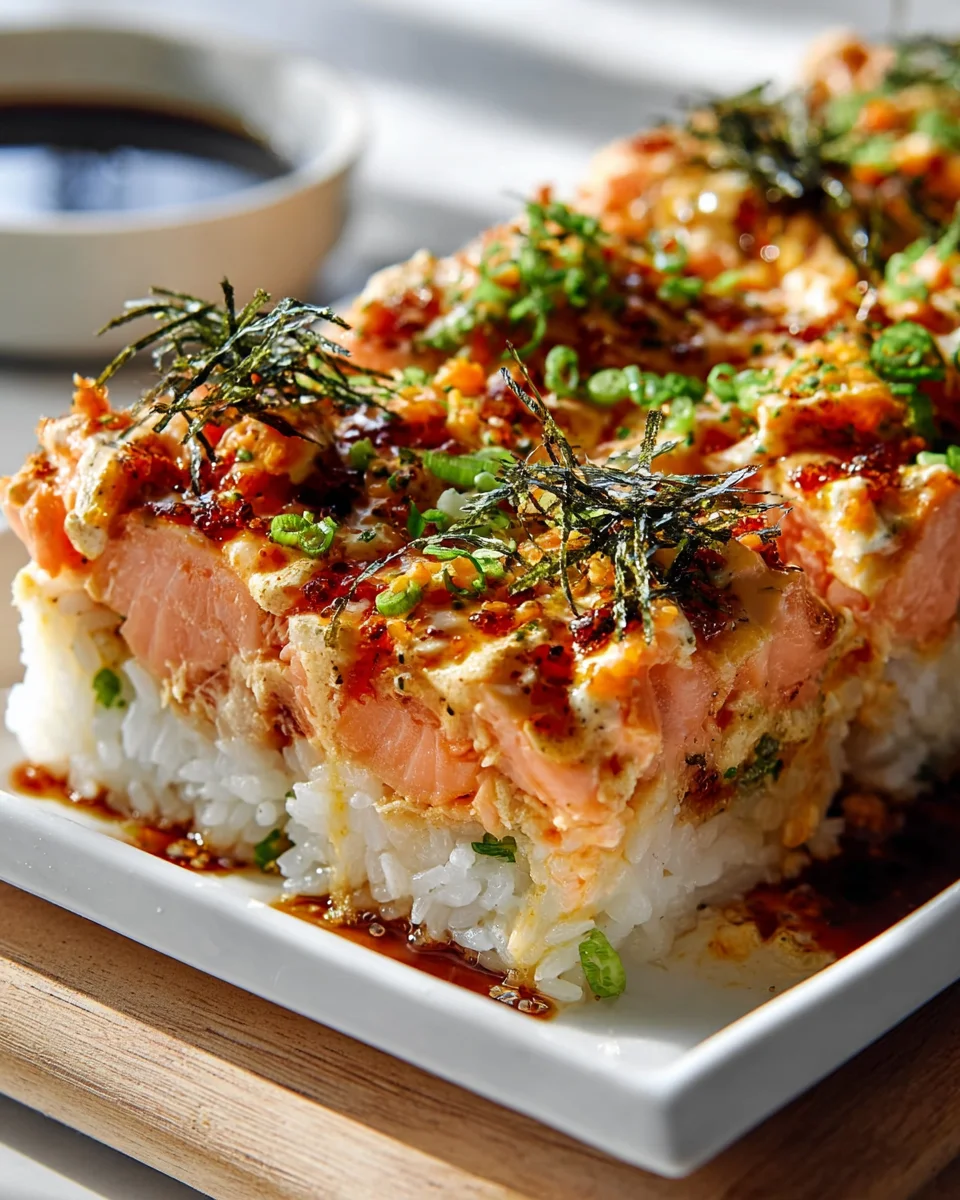
Spicy Salmon Sushi Bake Recipe has taken the culinary world by storm, offering a delightfully accessible way to enjoy the vibrant flavors of sushi right from your oven. If you’ve ever dreamt of creating a show-stopping dish that requires minimal rolling skills but delivers maximum impact, then you’re in for a treat. I’m absolutely thrilled to guide you through mastering this incredibly popular meal.
Originating from the creative kitchens of home cooks seeking an easy, shareable, and deconstructed sushi experience, especially popular during times when dining out was challenging, this bake truly hit its stride. People adore the sushi bake for its irresistible combination of creamy, savory, and perfectly spicy elements, all layered over a bed of seasoned rice. It’s the ultimate comfort food with an elegant twist, providing that satisfying umami flavor and a pleasant textural contrast in every forkful. Whether you’re a sushi aficionado or new to Japanese-inspired cuisine, this Spicy Salmon Sushi Bake Recipe offers a unique blend of convenience and gourmet taste that will undoubtedly become a staple in your home.

Ingredients:
- For the Sushi Rice:
- 3 cups Japanese short-grain rice (sushi rice)
- 3 cups cold water (or according to rice cooker instructions)
- ½ cup rice vinegar (unseasoned is fine, but seasoned adds more flavor)
- 2 tablespoons granulated sugar
- 1 teaspoon sea salt
- 1 tablespoon neutral oil (like canola or vegetable oil, for greasing the pan)
- For the Spicy Salmon Filling:
- 1.5 lbs sushi-grade salmon fillet, skin removed (I always opt for high-quality salmon here for the best flavor and texture!)
- ½ cup mayonnaise (Japanese Kewpie mayo is highly recommended for its richer, creamier texture)
- ¼ cup Sriracha sauce (adjust to your preferred spice level, I sometimes add a little extra kick!)
- 1 tablespoon soy sauce (low sodium is good)
- 1 teaspoon toasted sesame oil
- 4 oz cream cheese, softened (optional, but it adds a wonderful creaminess and richness)
- 2 tablespoons masago or tobiko (fish roe, optional, for extra texture and a pop of color)
- 2 green onions, thinly sliced, plus more for garnish
- For the Toppings and Garnish:
- 2 ripe avocados, thinly sliced or diced
- ¼ cup roasted seaweed snacks or nori sheets, cut into small rectangles or strips (essential for serving!)
- 2 tablespoons toasted sesame seeds (white and/or black)
- Extra Sriracha and mayonnaise for drizzling (mixed together for a final spicy mayo flourish)
- Optional: Furikake (Japanese rice seasoning)
- Optional: Pickled ginger and wasabi for serving
Preparing the Perfect Sushi Rice
My journey to creating the ultimate “Spicy Salmon Sushi Bake Recipe” always starts with the foundation: perfectly cooked and seasoned sushi rice. This isn’t just any rice; it needs to be sticky enough to hold together but individual enough to appreciate its texture. Trust me, getting the rice right makes all the difference!
-
Rinse the Rice Thoroughly: First things first, measure your 3 cups of Japanese short-grain rice into a large bowl. Now, cover the rice with cold water and, using your hand, gently swirl and massage the grains. You’ll notice the water becoming cloudy – this is the excess starch. Drain the water and repeat this rinsing process about 5-7 times, or until the water runs mostly clear. This step is crucial for achieving that distinct, non-gummy sushi rice texture. Once rinsed, drain it thoroughly in a fine-mesh sieve for about 15-20 minutes, allowing any residual water to drip away. Don’t skip this, it’s a game-changer!
-
Cook the Rice: Transfer the rinsed and drained rice to a rice cooker or a heavy-bottomed pot. Add 3 cups of cold water. If using a rice cooker, simply follow your appliance’s instructions for cooking white rice. If using a pot on the stovetop, bring the water to a boil over medium-high heat. Once boiling, immediately reduce the heat to the lowest setting, cover the pot tightly with a lid, and let it simmer for 18-20 minutes. It’s important to resist the urge to peek during this time, as it lets out the steam necessary for proper cooking. After 18-20 minutes, remove the pot from the heat and let it rest, still covered, for an additional 10 minutes. This resting period allows the steam to redistribute, resulting in perfectly fluffy grains.
-
Season the Rice: While the rice is cooking or resting, prepare your sushi vinegar seasoning. In a small saucepan, combine the ½ cup rice vinegar, 2 tablespoons granulated sugar, and 1 teaspoon sea salt. Heat this mixture over low heat, stirring constantly, until the sugar and salt are completely dissolved. Make sure not to boil it; you just want to warm it enough to dissolve the solids. Remove from heat and let it cool slightly.
-
Combine and Cool: Once the rice has rested, gently transfer it to a large, shallow, non-metallic bowl or a wooden hangiri (if you’re feeling authentic!). Pour the prepared sushi vinegar seasoning evenly over the hot rice. Using a spatula or a rice paddle, cut and fold the rice gently, making sure to distribute the seasoning without mashing the grains. I like to use a fanning motion (with a small fan or even a piece of cardboard) as I mix to cool the rice quickly. This technique helps to give the rice a glossy sheen and a perfect texture. Continue mixing and fanning until the rice is shiny, fluffy, and has cooled to about room temperature. It’s essential that the rice is at room temperature before you start assembling your bake, otherwise, it can make the other layers mushy. Cover loosely with a damp cloth or plastic wrap to prevent it from drying out while you prepare the salmon.
Crafting the Irresistible Spicy Salmon Filling
The heart of our “Spicy Salmon Sushi Bake Recipe” is undoubtedly the rich, flavorful, and perfectly seasoned salmon. This step is where we infuse all those amazing spicy and umami notes that make this dish so addictive.
-
Prepare and Cook the Salmon: Preheat your oven to 400°F (200°C). Place the salmon fillet on a baking sheet lined with parchment paper for easy cleanup. You can season it simply with a pinch of salt and black pepper if you like, or leave it plain as the spicy mayo will add plenty of flavor. Bake for 12-18 minutes, depending on the thickness of your fillet, or until the salmon is cooked through and flakes easily with a fork. I always recommend not overcooking it to keep it moist and tender. Once cooked, remove from the oven and let it cool slightly. Once cool enough to handle, flake the salmon into small, bite-sized pieces using a fork. Discard any dark bits or pin bones you might find.
-
Mix the Spicy Mayo Base: In a medium-sized mixing bowl, combine the ½ cup mayonnaise (Kewpie mayo truly shines here!), ¼ cup Sriracha sauce, 1 tablespoon soy sauce, and 1 teaspoon toasted sesame oil. Whisk everything together thoroughly until it’s beautifully smooth and evenly colored. This is your spicy mayo base, and you can adjust the Sriracha at this point to make it as fiery or as mild as your taste buds desire. Taste and adjust, my friends, it’s your bake!
-
Incorporate Optional Cream Cheese: If you’re using cream cheese (which I highly recommend for an extra layer of decadence and creamy texture), ensure it’s softened to room temperature. Add the softened cream cheese to the spicy mayo mixture and mix well. I often use a hand mixer or a fork to really get out any lumps and ensure it’s fully incorporated into a smooth, luscious sauce. This will make your salmon filling incredibly rich and comforting.
-
Combine Salmon and Filling: Add the flaked salmon, 2 tablespoons of masago (if using), and 2 tablespoons of thinly sliced green onions to the bowl with the spicy mayo mixture. Gently fold everything together with a spatula until the salmon is evenly coated. Be careful not to overmix, as you want to keep some texture in the salmon. This mixture is truly a delight on its own, but it becomes something magical when baked.
Assembling Your Spicy Salmon Sushi Bake
Now for the fun part! This is where all our carefully prepared components come together to form the glorious “Spicy Salmon Sushi Bake.” Get ready for some layering action!
-
Prepare the Baking Dish: Choose a roughly 9×13 inch baking dish. Lightly grease the bottom and sides with about 1 tablespoon of neutral oil. This helps prevent the rice from sticking and ensures easy serving. A glass or ceramic baking dish works perfectly for this.
-
Layer the Sushi Rice: Transfer all the seasoned sushi rice into the prepared baking dish. Using the back of a rice paddle or a spatula, gently press the rice down into an even, compact layer. You want it to be firm but not overly compressed. Aim for a layer that’s about 1 to 1.5 inches thick. This rice layer forms the stable and delicious base of our sushi bake. Ensure the rice goes all the way to the edges for a uniform bake.
-
Add the Salmon Layer: Evenly spread the spicy salmon mixture over the pressed sushi rice. Use your spatula to distribute it from edge to edge, ensuring every bite gets a generous amount of that delicious, creamy, spicy salmon. Gently smooth out the top so it’s a relatively even layer. This is the star of the show, so be generous!
-
Arrange the Avocado (Optional, but highly recommended): If using, artfully arrange the thinly sliced or diced avocado over the salmon layer. Avocado adds a beautiful creaminess and freshness that perfectly complements the rich salmon and spicy mayo. If you’re worried about browning, you can brush the avocado lightly with a bit of lemon juice, but since it’s going into the oven, it usually holds up well. I love how the vibrant green contrasts with the salmon!
Baking and Finishing Touches
The moment of truth! Baking our “Spicy Salmon Sushi Bake Recipe” brings all the flavors together, creating a warm, comforting, and absolutely irresistible dish. And the final garnishes? They’re the cherry on top!
-
Bake to Golden Perfection: Place the baking dish into your preheated 400°F (200°C) oven. Bake for 15-20 minutes, or until the top layer of the salmon is lightly golden brown and bubbling around the edges. If you desire a slightly crispier top, you can turn on the broiler for the last 2-3 minutes, but watch it very carefully to prevent burning! The goal is to heat everything through and get a nice slight crust on top. When it comes out of the oven, it will smell absolutely divine!
-
The Final Drizzle and Garnish: Once out of the oven, let the sushi bake rest for 5-10 minutes. This allows it to set slightly, making it easier to cut and serve. While it rests, you can prepare your final garnishes. In a small bowl, whisk together a bit more Sriracha and mayonnaise for a decorative drizzle. Slice the remaining green onions. Once the bake has rested, drizzle the extra spicy mayo artfully over the top. Then, sprinkle generously with the toasted sesame seeds, remaining thinly sliced green onions, and a dusting of furikake if you have it. These garnishes aren’t just for looks; they add extra layers of flavor and texture!
-
Serve and Enjoy: To serve, cut the sushi bake into squares or rectangles directly in the baking dish. The best way to enjoy this is by scooping a portion onto a piece of roasted seaweed snack or nori. Imagine a warm, flavorful bite of rice, spicy salmon, creamy avocado, and crunchy nori – it’s an explosion of flavors and textures in every single mouthful! Serve immediately with optional sides of pickled ginger and a dab of wasabi for those who love an extra kick. This “Spicy Salmon Sushi Bake Recipe” is perfect for sharing and always a crowd-pleaser at any gathering. Enjoy every delicious bite!
Conclusion:
If there’s one dish I wholeheartedly encourage you to add to your regular rotation, it’s truly this magnificent creation. I’ve shared many recipes over the years, but this one holds a special place in my heart because it combines so many elements of what makes a meal truly satisfying: comfort, flavor, and a touch of exciting flair. This isn’t just another dinner; it’s an experience. The way the creamy, spicy salmon topping bakes into a delicate crust over the perfectly seasoned rice, creating layers of texture and taste with every bite, is simply unparalleled. It’s the kind of dish that disappears quickly from the table, eliciting smiles and satisfied murmurs from everyone enjoying it. What I particularly love about this Spicy Salmon Sushi Bake Recipe is its ability to deliver the gourmet sushi experience in a deliciously accessible, deconstructed format that requires no complicated rolling techniques. It democratizes the sushi experience, making it approachable for even the most novice home cooks, yet it’s impressive enough to serve to guests at your next gathering.
I truly believe this recipe is a game-changer for anyone looking to impress without the stress. It’s perfect for a cozy movie night, a casual potluck, or even as a unique main course for a celebratory meal. The harmonious blend of savory, slightly sweet, and tangy rice, contrasted with the rich, flaky, and beautifully spiced salmon, creates a symphony of flavors that is both comforting and exhilarating. The slight crispness that develops on top during baking is what really seals the deal for me, adding an extra dimension that you simply won’t get from traditional sushi rolls. Plus, it’s a fantastic way to enjoy salmon, a powerhouse of nutrition, in an incredibly delicious and engaging manner. You’re not just making a meal; you’re crafting a culinary adventure that tastes utterly fantastic and looks incredibly appealing.
Now, to elevate your sushi bake experience even further, let’s talk serving suggestions and exciting variations. My absolute favorite way to enjoy this masterpiece is by wrapping generous spoonfuls of the bake in crisp sheets of roasted seaweed (nori). The delicate crunch of the nori against the warm, soft rice and creamy salmon is pure perfection. Don’t stop there, though! Consider serving it with thin slices of fresh cucumber or creamy avocado for an added layer of texture and coolness that beautifully complements the warmth and spice of the bake. A drizzle of extra sriracha mayo or a touch of sweet unagi sauce can also enhance the flavors, allowing each person to customize their perfect bite. For a more substantial meal, a simple side salad with a ginger dressing or a comforting bowl of miso soup makes for an excellent accompaniment, transforming your sushi bake into a complete Japanese-inspired feast.
When it comes to variations, the possibilities are virtually endless, and this is where you can truly make the recipe your own.
Want to try a different protein?
Go for imitation crab meat, cooked shrimp, or even baked tuna for a unique twist. For those who prefer a vegetarian option, baked marinated tofu or a medley of roasted mushrooms could work wonderfully, maintaining that umami richness. Feel free to play with the spice level; add more sriracha or a pinch of gochugaru (Korean chili flakes) if you like it extra fiery, or dial it back for a milder, family-friendly version. You can also experiment with additional toppings after baking: a sprinkle of tobiko or masago for that authentic sushi pop, toasted sesame seeds, extra chopped green onions, or even a dash of furikake for an additional savory crunch. I’ve even seen some creative cooks add a thin layer of cream cheese to the rice before the salmon topping for an extra creamy and indulgent bake!
So, there you have it. I genuinely urge you to clear your schedule, gather your ingredients, and dive headfirst into making this incredible dish. I promise you, the aroma filling your kitchen as it bakes, and the first delightful bite, will make you incredibly happy you did. It’s a dish that brings people together, sparks conversation, and satisfies cravings in the most delightful way possible.
Don’t miss out on this culinary joy!
Once you’ve made it and experienced its magic, I would absolutely love to hear about your adventure. Share your photos, tell me about any creative variations you tried, or simply let me know how much you and your loved ones enjoyed it in the comments below. Your feedback and experiences mean the world to me, and they inspire me to keep sharing more delicious recipes like this one. Happy baking, and enjoy every single incredible bite!
Spicy Salmon Sushi Bake Recipe
This Spicy Salmon Sushi Bake offers a delightfully accessible way to enjoy the vibrant flavors of sushi right from your oven. It’s a show-stopping dish requiring minimal rolling skills but delivering maximum impact, combining creamy, savory, and perfectly spicy elements over a bed of seasoned rice.
Ingredients
Instructions
Important Information
Nutrition Facts (Per Serving)
It is important to consider this information as approximate and not to use it as definitive health advice.
Allergy Information
Please check ingredients for potential allergens and consult a health professional if in doubt.

Leave a Comment